Creating Handheld Form

I’ve been tasked with creating a new handheld usable form to enter in a VIN (Serial number) , and display the Job’s associated with it from SNTrans. I’ve not done anything like this, except perhaps an updatable dashboard. How do you create new handheld forms and add them to the handheld menu?

Even in developer mode, I couldn’t customize an existing Handheld form, or at least I couldn’t figure out how, the option wasn’t there in my menu like a regular form.

-Scott

This is normally done in material management, data collection, handheld menu’s, these can then be customised as per normal.

Ah, I finally figured out to right click on the hand held form to get to the dropdown that gives me customization, I was looking in Tools on the main screen. But how can I create a new handheld form entirely or do I have to customize an existing form?

You have to customize an existing screen to do what you need it to, or take a UD form and force it to form and fit the handheld style.

Here is my base code I use to do that

// Add these usings
using Infragistics.Win.UltraWinToolbars;
using Infragistics.Shared;
using Infragistics.Win;
using Infragistics.Win.UltraWinDock;
using Infragistics.Win.UltraWinStatusBar;
using System.Reflection;
 
public class Script
{
    public void InitializeCustomCode()
    {
        // You need to add a replacement closing button
        this.btnClose.Click += new System.EventHandler(this.btnClose_Click);
    }
 
    public void DestroyCustomCode()
    {
        this.btnClose.Click -= new System.EventHandler(this.btnClose_Click);
    }
 
    private void MoveWIPForm_Load(object sender, EventArgs args)
    {
        // Add Event Handler Code        
        RemoveToolbars();
        RemoveStatusBar();
        ReconfigureDocks();
 
        oTrans.EpiBaseForm.ControlBox = false;
        oTrans.EpiBaseForm.MaximizeBox = false;
        oTrans.EpiBaseForm.MinimizeBox = false;
        oTrans.EpiBaseForm.CancelButton = btnClose;
        oTrans.EpiBaseForm.Location = new System.Drawing.Point(0,0); 
        oTrans.EpiBaseForm.FormBorderStyle = FormBorderStyle.None;
 
        // 242 by 263 is the HH form size. Comment this out to move the base controls where you need them first
        oTrans.EpiBaseForm.Size = new System.Drawing.Size(242, 263);
    }   
 
    private void RemoveToolbars()
    {
        foreach(UltraToolbar tl in oTrans.EpiBaseForm.MainToolManager.Toolbars)
        {
            tl.Visible = false;
        }        
    }
 
    private void RemoveStatusBar()
    {
        UltraStatusBar ultraStatusBar1 = (UltraStatusBar)oTrans.StatusPanel.UltraStatusBar;
        ultraStatusBar1.Visible = false;
    }
 
    private void ReconfigureDocks()
    {    
        // Remove docking area containing EpiTreeView
        object etv1 = oTrans.EpiBaseForm.GetType().InvokeMember("epiTreeViewPanel1", BindingFlags.Instance | BindingFlags.GetField | BindingFlags.NonPublic, null, oTrans.EpiBaseForm, null);
        EpiTreeViewPanel epiTreeViewPanel1 = (EpiTreeViewPanel)etv1;
        ((DockableWindow)epiTreeViewPanel1.Parent).Pane.Close();    
 
        // Remove docking bars
        object udm = oTrans.EpiBaseForm.GetType().InvokeMember("baseDockManager", BindingFlags.Instance | BindingFlags.GetField | BindingFlags.NonPublic, null, oTrans.EpiBaseForm, null);
        UltraDockManager baseDockManager = (UltraDockManager)udm;
        foreach(var dockArea in baseDockManager.DockAreas)
        {
            dockArea.Settings.ShowCaption = Infragistics.Win.DefaultableBoolean.False;
            foreach(var pane in dockArea.Panes)
            {
                pane.Settings.ShowCaption = Infragistics.Win.DefaultableBoolean.False;
            }
        }       
    }
 
    private void btnClose_Click(object sender, System.EventArgs args)
    {
        oTrans.EpiBaseForm.Close();
    }
}
3 Likes

Thanks! That will be very helpful, since this is new I’ll have to use a UD form, how do I create a UD form? I have to add a menu item pointing to one of the UD tables?

correct, add a menu item for your UD form, apply your customization to it, and then you have to customize the handheld menu to add your new item manually.

something on this lines Add additional menu for Handheld Material Handling - #3 by darista

Or you can use a dashboard. Handheld Change Workstation

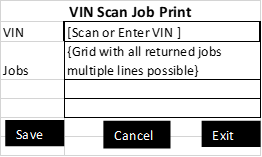
The user wants it to go under Production, this is pretty much the requirements I got from the user
The screen layout shall fit the Epicor standard handheld size. Here is a suggested layout below:

VIN :

Once the VIN is scanned it should be set to auto tab and search SNTran table for serial number and return all associated jobs where material sequence= Null

Upon Save button will trigger an update to set the JobHead.JobFirm = True, the JobHead.JobReleased field = True and call the Job Traveler Print using the default report style set for that company and set in the background. See below:

image

Cool seems very manageable with a UD Form and the code I sent you. Good Luck!

Thanks! I’ve got the new UD form and your code put in, but I’m not sure how to delete the existing controls. Right now the UD02 form looks like this

If I try to delete anything in mainPanel1, or anything else it says ‘cannot delete native controls, you can only delete custom controls’

Given the nature of your question I would recommend reviewing the Epicor Customization and Ice Tools guides to get a baseline of customizing forms and working with native controls.

1 Like

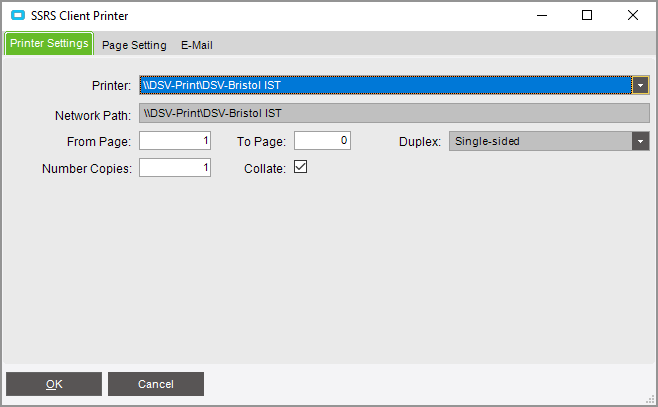
Thanks for all the help, this is moving along. I’ve gotten to the point that I want to print the job traveller, and have got the print working using this code

Erp.Proxy.Rpt.JobTravImpl report = WCFServiceSupport.CreateImpl<Erp.Proxy.Rpt.JobTravImpl>(otSession, Epicor.ServiceModel.Channels.ImplBase<Erp.Contracts.JobTravSvcContract>.UriPath);
Erp.Rpt.JobTravDataSet ds = report.GetNewParameters();

		ds.JobTravParam[0].Jobs = strJobNum; 
	    ds.JobTravParam[0].AutoAction = "SSRSClientPrint"; // Alternative Option: "Print"
	    ds.JobTravParam[0].AgentSchedNum = 0;
		ds.JobTravParam[0].AgentID = "SystemAgent";
		ds.JobTravParam[0].AgentTaskNum = 0;
		ds.JobTravParam[0].ArchiveCode = 0;
		ds.JobTravParam[0].ReportStyleNum = 1003; 
	    ds.JobTravParam[0].WorkstationID = strWorkstationID;
	    ds.JobTravParam[0].DateFormat = "dd/mm/yyyy";
	    ds.JobTravParam[0].NumericFormat = ",.";
	    ds.JobTravParam[0].PrntAllMassPrnt = false;
	    ds.JobTravParam[0].PrinterName = printerName;
		ds.JobTravParam[0].SSRSRenderFormat = "PDF";
		
		ds.JobTravParam[0].RptPageSettings = "Color=False,Landscape=True,PaperSize=[Kind=\"Letter\" PaperName=\"Letter\" Height=1100 Width=850],PaperSource=[SourceName=\"Automatically Select\" Kind=\"FormSource\"],PrinterResolution=[Kind=\"Custom\" X=600 Y=600]";
	    ds.JobTravParam[0].RptPrinterSettings = "PrinterName=" + dquote + printerName + dquote + ",Copies=1,Collate=True,Duplex=Simplex,FromPage=1,ToPage=0";
	    
		report.SubmitToAgent(ds, "SystemAgent", ds.JobTravParam[0].AgentSchedNum, 0, "Epicor.Mfg.UIRpt.JobTrav");

But, as you see, I hard coded the RptPageSetting and RptPrinterSetting from what I saw in the trace, I actually want to default those from the users defaults like they printing from the job traveller report, from this screen

and this screen

image

Where can I find these defaults?

-Scott