i am building a configurator and its almost complete, however i cant seem to work out how to set a checkbox to true by default. anyone know how to do this?
1 Like
Hey Tony!
So, there’s a couple ways you can go about this. I ran into the same issue a couple months of ago when we were trying to accomplish the same thing.
Firstly, you could do this with an On Load Event. Basically, you can create a condition where, as soon as the configurator is loaded in a configuration session by your sales team/whomever, the state of the checkbox is set to “True” by default.
Another option is to create a UD Method that is bound to your checkbox input that will set it to true based on some custom code that would look like the below:
// Make sure you replace checkbox1 with the name of your checkbox input instead.
checkBox1.Checked = true;
The logic in the Expression Editor within Application Studio can be a little tricky sometimes. There are certain functions that would be used in standard C# that aren’t usable within the Editor so it can be a little difficult to construct as you would with a more freeform code editor.
You may want to consider including a line that checks the status of the checkbox prior to setting it to true as well. This seemed to work a little better for us in some of our more complex configurations when we were testing. I also included some message boxes as well when I was testing to make it easier to identify what results were produced by the UD method.
Something like:
// Verify if the checkbox is checked
if (!checkBox1.Checked)
{
// If it is not checked, set it to checked
checkBox1.Checked = true;
MessageBox.Show(“The checkbox was not checked and has been set to true.”);
}
else
{
MessageBox.Show(“The checkbox was already checked.”);
}
}
I hope this helps! I’ve spent a lot of time with the embedded configurator, so if you have any other questions feel free to reach out and I’d be happy to help!
Good luck!
Hi, thanks for the info!!
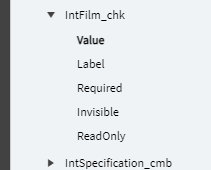
this has not worked for me at all. i did try this with the onloaded method already contained in the configurator with no success, it does not recognise the ‘checked’ command.
image shows the only commands i have available to me (i believe)
2024.8 is not nice, it seems like nothing makes sense where its been placed!
Haha yeah I feel you there. I haven’t tested any of this in the 2024 upgrade yet so there’s a good possibility it’s not working the same as it did when we were testing this in 2022.x.
I’ll do some experimenting in our test environment today that’s just been upgraded to 24’ and see if I can figure something out there.
Application Studio is definitely really tricky and works when it wants to. ![]()
Thank you so much! i do appreciate you checking…
i also have an issue with writing values to a text box:-
in our ‘classic’ configurator, we choose data based on the specification, commercial category, thickness and partwidth, it takes these values and then returns a part number to a text box, works flawlessly in classic, trying to do the same in kinetic is problematic but should be a simple thing!
No problem! I’ll let you know what I find when I get a chance to take a look later today hopefully.
So, if I’m understanding correctly, what you’re looking to do is construct a Part String/Part Number that will populate in a text box after completing the configuration session?
It’s definitely a bit tricky in Kinetic. It took us a little while to figure that out early on as well. I’ll summarize the steps that will hopefully get you on the right track in setting that up as well.
- So, the first thing you’ll want to do is go to the Configurator Entry screen and select the configurator you want to set the part string up for. Then, go to the Record Creation tab in the Nav. tree as shown below:
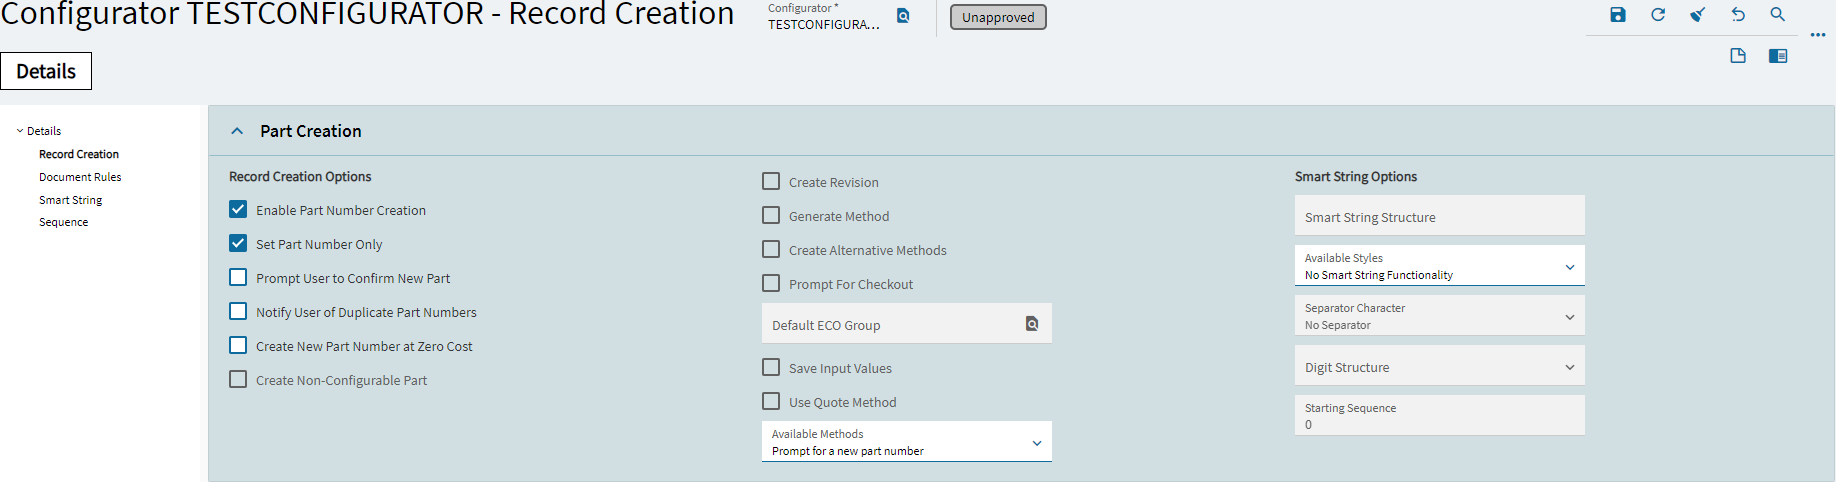
-
Next, check the Enable Part Number Creation checkbox. All of the settings below that can be selected based on what you guys want the part number generation to do and are mostly optional. Having users confirm part before it’s added, duplicate part numbers, zero cost options, etc. These are all generally pretty optional I’ve found though.
-
Move over to the Smart String Options section on the right side of the card. This is where you construct how the part string will be generated in the configurator. You’ll have 3 options here:
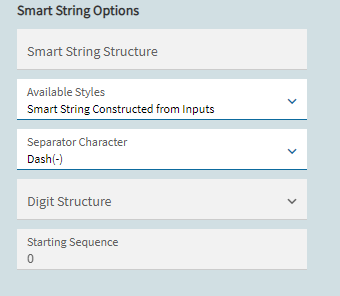
Smart String Constructed from Inputs: This will generate a string based on the inputs on your configurator itself. (Combo boxes, check boxes, etc.) This is what we use and have had the most success with, and would be my recommendation. An example would be something like UNITNAME-126-GY-N4-XO (Broken down, this is the Unit - voltage - color - NEMA rating - Alarm output addon option.)
Part Number + Order/Quote + Order/Quote Line: This one is a bit more specific in that it will combine the part number for the configured item, the order/quote it is present on (Order 42, Quote 16, etc) and the line number of the configured item (Order 42, Line 1 etc.) I wouldn’t really recommend this one either, because your part table may get super messy and hard to identify with all of the numbers flying around.
Part Number + Sequential Number: I’ve actually not used this one, but it’s pretty simple as well. Basically it will just take your base part number, and add a sequential number incrementing in however you set it up. I could see this being useful if you are configuring a ton of the same type of unit frequently, and this acts similarly to serialization structure.
-
Select a Separator Character in the field below Available Styles. You can use anything you want, but I feel the Dash(-) or Slash(/) have the best legibility.
-
Next, scroll down the page a little to the Options card. Here is where you construct the format of the part string itself.

There are 3 checkboxes here:
Preface w/ Part Number: This checkbox will ensure that your Part Number is always the leading value in the smart string that is constructed. So for example, if your part is “TUBE1000”, it will always be the first value in the string by default.
Customer Part Number: Check this box if the smart string that is generated is a DIFFERENT part number than what you track with internally. For example, if your part is called TUBE1000 in the system, but is shown to the customer as Duraflex Drain Tube, check this box. Generally though, you probably won’t need this.
Part Description: This checkbox will pass the part string into the Part Description field after the new part is created. This can be useful for data entry or if you want to keep track of configured parts separately from non-configured ones. This one is up to you guys.
- Next, go over to the grid view on the right side of the card and click the + there. This is where you construct the sequence of your part string. You can select what position you want the inputs to be in for your completed smart string after a configuration session.

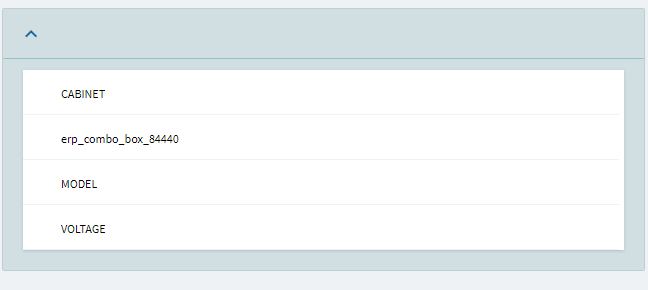
List of inputs that are on your configurator from Configurator Designer

This part can be a little tricky and might require some testing to get it just right. In this example, I’ve just used each input in the order it shows on the configurator canvas in Configurator Designer.
- Save your work. You now have the settings and formatting ready to go for the part string.
Once I have a little more time this afternoon, I’ll write out the steps on how you can create a Document Rule/UD Method to pass the completed part string to both the text box you created on the config, as well as any other fields/screens you want it to be present on. (Quote,Sales Order, Job, etc.)
Another great resource for this process is the Configurator Technical Reference Guide, if you haven’t used it already. It’s a 400 page document that goes over most of the configurator functions in great detail. Most of it is still written for Classic, but a lot of the functionality is the same between both Classic/Kinetic. I don’t think I’d have survived without it starting out haha.
If you don’t have it let me know and I’d be happy to send it over to ya.
Hope this helps man!
Hi Austin,
our classic configurator
you choose your options, click a ‘vew description’ button and that will populate a text box (pic below)
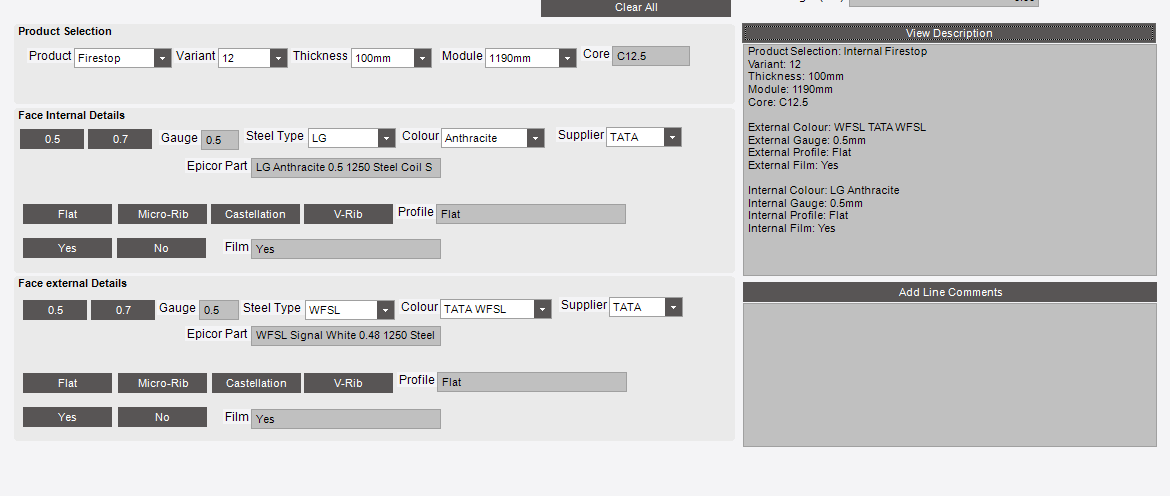
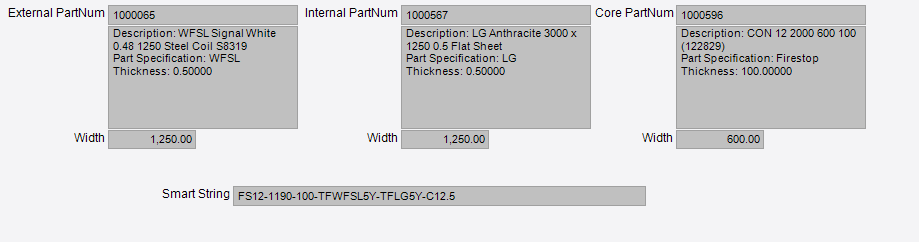
you then click to go to page 2 and you see the part numbers and the smart string generated inside the configurator (something i am looking to replicate)
at the moment i have the following:
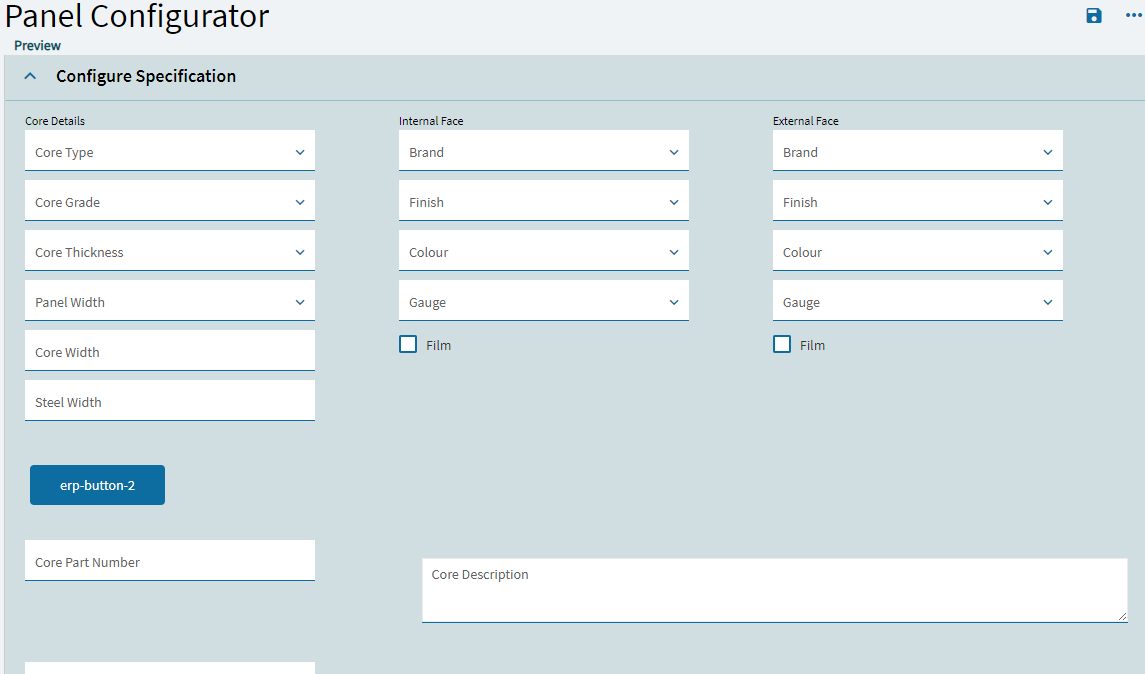
the drop down boxes are working as expected, as with the classic version once all the options have been chosen, i would like to click the button and then retrieve the part numbers and descriptions for the 3 chosen items required.
and the tick boxes for film checked by default ![]()
i know i wont be far away from what i want to do…its just the little nuances of Application Studio to make things difficult!
the smart string info you have provided may be a much better way of creating the smart string so i will certainly look at this once i have the other bits sorted out.
EDIT: forgot to mention atm when i press the button it breaks everything! ![]()
1 Like
Okay awesome!
Thanks for the screenshots. It’s a bit clearer to me now after seeing that, as we’ve never worked in Classic or built any configurators there.
Yep, it looks like the part string stuff I laid out above should be exactly what you’re needing then. Once you get your first part string set up on a config it’ll become pretty smooth once you get the hang of it.
We’ll basically just need to write a condition that will pass the string into the Core Part Number text box which will be simple enough. Once we have it working it’ll look very similar to what you guys are seeing in your Classic config right now.
Yeah, if there’s one thing I’ve learned after self destructing many configurators with buttons that have nothing bound to them yet, it’s that they are quite… unpredictable. That’s pretty much App Studio in a nutshell.
It works great a lot of the time, but we’ve had to get creative with some workarounds to get stuff done in there. It’s a labor of love(and frustration) most of the time. ![]()
Update to follow soon!
Hi Austin,
Had some tinkering time tonight after work…and i think i have half a solution, although in my UDMethod the system.covert.todecimal.command isnt working for converting the 1200 and 1250 values below the panel width so.in the core part number i am getting “no part found” as per the code i have written.
I will share how i did this tomorrow when i am back at work. I plan on sharing a full guide how i got this far as the Epicor documentation for Application studio, i am finding less than helpful, some of the options i had in 2023 are not there in 2024 anymore, or they have moved and i have not found them yet!!!