Anyone know if a command line utility to create HPGL code for a given text?
We have an engraver that uses HPGL code for guiding the tool and want to be able to have it engrave S/N’s sent to it.
The current system is:
Open the very clunky (and easy to messup) software that you use to design the engraving.
Open the file we use as a template and manually change the text boxes for model#, s/n, and date
Click the engrave button.
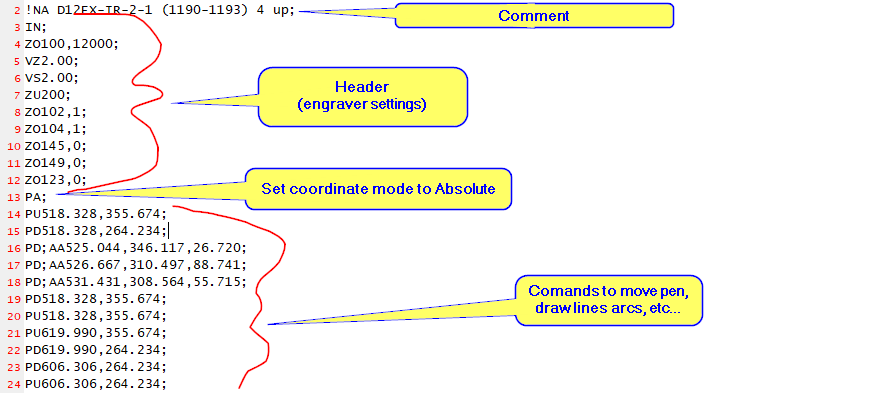
This creates the HPGL file the settings for the engraver and all the pen commands(move, pen down, pen up, draw line, draw arc, etc…)
Another program scans for new files and then sends them to the engraver.
I’d like to be able to pass the model#, s/n, and date as text, and get the relative pen movements for each. I understand that I’d need to preset things like the font and location.
I’d then combine the fixed code for the engraver settings (call this the header info) with the pen movements generated for the given input text (call this the body), and finally add fixed code for homing the engraver head (the footer code).
My very hacky first pass is to use the engraver software to generate the HPGL for every single character I’d need. Then make individual text files for each - stripping the header and footer info out into their own files. Then have a program that just just combines the contents of each file as needed. In pseudo code:
outtext = read("header.txt")
for each c in instring
  outtext += read(format(code(c),"000"+".txt")
outtext = read("footer.txt")
output("\spool_dir\job.spl", outtext)
It would be way more complicated than that as I’d need to add code to position the pen before each character is apoended.
Could you get a library of each letter/number/symbol and kind of stitch together the code from the library? And in-between each character set a starting point?
We had a stamping machine. When I got there, they would use the manual typewriter built into it. Needless to say, we scrapped a lot of tags. The machine had a serial interface and I looked up the commands to stamp. Basically, I needed three commands: home, move to, stamp text.
So we created a template for each layout (multiple tags used the same layout so this cut down on the number of templates). A template was defined in a UDxxxA table and each stamped element was defined in the child records. There would be a record for the job number, the part, the serial number, etc. When we went to stamp a tag, it would get the plate number which had the template assigned to it. It would then replace the text value of the various elements and then stamp the text at the location in the template.
With the stamping text and location parametrized, it was easy to call a routine to move the stamper (pen) for each item, and then stamp (write) it.
That’s kind of what I was doing by creating the HPGL file for each character one at a time.
Or were you saying to make a single HPGL for 0123456789ABCD..XYZ and then manually add some indexes so that I could just grab the lines of code that are needed for that specific character?
One thing that kind requires extra work by me is that all the move and draw commands the engraver software makes are absolute coordinates. So I’d have to convert them to relative, to be related to where the location of that one character would be. Or add X and Y offsets to each command to make each letter in the output file absolute.
Is it like G-code, where you have the option of having absolute subroutines run from a different start point? You save each character as a sub-program that ends with the stylus at the next starting position 0,0 and then call the next letter. I did that 20 years ago programming a CNC to engrave shift knobs (Firehawk #123) when I got tired of creating unique programs for each customer.
Or does it need to be one string of absolute locations, and you are basically programming each individual impact point?
Maybe you can get an HPGL printer driver to do it for you, and add that as a printer to Epicor.
Yes, I was thinking of having the code to grab for each letter.
Could you make every character the same size? Or, also save the block size somewhere (I’m imagining that based on the font, font size, and character; that you know what the absolute block size that it fits in.)? Then you could do math to set the coordinates. You know that every new block would start at height Y and then just continue to offset the size of the block just written to get the X value.
Let me know if I am waaayyy off base, I’m just spitballing.
It is similar to G-Code (like the Gerber files my PCB CAD generates, or the extruder movements of my 3D printer).
I’m not really sure if it is HPGL compliant, or just borrowed the structure and only supports a subset. The manufacturer is unsurprisingly tight lipped.
HPGL looks like a universal standard. Other than your proprietary engraver settings, I think the rest would be universal. There are lots of HPGL manuals out there.
You have the option to do relative & absolute. What if you copied the header lines, and for each letter, went to relative from the character’s starting point, then a PD for plotter down. At the end of each letter, plotter up & jog to the next starting point 0,0. And after each row, change to absolute and jog down and over again.
You could make a file for each letter to get the plotter code, and copy that into your function.
Looks doable. Good luck, and present it at Insights!
This is interesting - in so much as a fool around with gcode in my limited spare time. I found two things that might lead you to a solution with a little bit of coding
I did notice that utility, but havent had a chance to play with it.
I thought I found a solution built right into the HPGL language. There’s a command LABEL (‘LB’) that you pass a string to and it draws text. There are other commands for setting up the scaling and what not. For example:
PU;PA0,0;   // lift pen, and move to 0,0
DT$,0;      // Set dollar sign as text terminating character
SI0.5,0.8;  // Set text size
LBW0.5cm,H0.8cm$  // Draw the text "W0.5cm,H0.8cm"