How do you add a report under the actions menu in a form and pass a variable from the form to the report?
Rick,
I’ve had luck calling a report from a button as well as a Context Menu (right click and Open With). I have not added one to the Actions menu, thought I suspect it can be done without a great deal of headache. Before I try to find info on how to add to Actions, would either of the other two methods suffice? I have code I could share that would help.
What kind of of report are we talking? BAQ, SSRS?
@dr_dan Count me as interested. I’ve always wanted to know how to do this.
BUTTON CLICK (I did not invent this, I found most of the info I needed elsewhere on this forum).
Here’s the customization:

As you can see, I added a button to the Case Entry screen. It’s called btnPrint.
I used the event wizard and selected my button and the click event. I let the wizard add the bits to the script and then created this function inside the btnPrint_Click event.

This was my code for the button click:
	private void btnPrint_Click(object sender, System.EventArgs args)
	{
		// Establish your reference to the BAQ Report UI
		Ice.UI.Rpt.BAQReport.Transaction trans = new Ice.UI.Rpt.BAQReport.Transaction(oTrans);

		// Load the specific BAQ Report by ID you are interested in
		trans.LoadBAQReportData("CaseReport");

		// Get the current Case Number
		var myEDView = oTrans.Factory("HDCase");
		var currentRow = myEDView.dataView[myEDView.Row];
		int caseNum = Convert.ToInt32(currentRow["HDCaseNum"]);

		// Fill in the parameters to run the report.  You can find these
		// by using field help on the BAQ Report dialog.
		EpiDataView edvData = (EpiDataView)trans.EpiDataViews["ReportParam"];
		edvData.dataView[edvData.Row]["field1"] = caseNum;

		// Submit to system agent.  You can do either a preview or print here
		trans.RunDirect("Preview");

		// Clean up the objects
		edvData.Dispose();
		trans.Dispose();
	}
So what you’re looking at is a Case Report that we created (because Epicor did not have one out of the box). It’s a BAQ report, hence the references to BAQ Reports in the logic there. It could be an SSRS report, also, though but you’d have to tweak those references accordingly. As you can see, I have to get the current Case Number to pass into the report parameter. The report has to be setup with an option field (not a filter). You can have the filters also, should you want to ever run the report with many results, but the option field will only return the 1 value you specify. Here’s a screenshot of what the BAQ Report Designer looks like.


Looking at the field help, you can see what the field is called so you can refer to it in the C# code:

Note that the dataView is the same as the EpiBinding - and then the field is after it.
The bit about trans.RunDirect(“Preview”) will force the report to go straight to Preview, so you won’t get the dialog to pop up when you click the button.
3 Likes
CONTEXT MENU PRINT (This was more of a creative thought of my own but still I found all the references I needed on this forum).
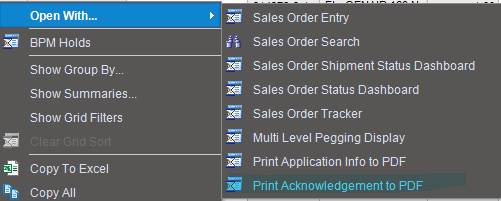
I setup a new Context Menu item on the OrderHed.OrderNum Context Menu. Actually, two. But the one I am highlighting is an out of the box report that Epicor offers, so I thought it would be a better example. The Print Application Info to PDF item in the list is a BAQ Report, so it handles a lot like the last example. The Acknowledgement is an SSRS report.
The trick to this was to create a menu path for that Acknowledgement report.

Then you can refer to this menu location in the Context Menu Maintenance.

As it turns out, the Context Menu already wires up the sales order number from the context menu into the Report - so there was no custom coding required to make this work.
BONUS:
In my example here, I actually have two menu locations. One has a customization to “Auto Print to PDF” and the other will simply launch the default print dialog. My Context Menu actually points at the Auto Print version - hence why the menu ID is UDOMACKN instead of UDOMACKA like I highlighted in the above image.
The Customization to AutoPrint looks like this:
	public void SalesOrderAckForm_Shown(object sender, EventArgs e)
	{
		if(SalesOrderAckForm.LaunchFormOptions != null)
		{
			this.oTrans.RunDirect("Preview");
			this.SalesOrderAckForm.Close();
		}
	}
I was recommended to use the “Shown” event (which is not an event available in the Event Wizard). This one essentially pulls open the print dialog, and then immediately sends to Preview and then closes itself. So it’s not quite as neat as the Case Report example, but it is a nice little function to cut down on mouse clicks - especially where the user doesn’t need all the fancy options that the print dialog offers.
3 Likes
PRINT FROM ACTIONS MENU:
This was the original request of the post. I was able to piece this together using another post on this forum as well. Here is my first example with the Case Report but added to the Actions Menu:
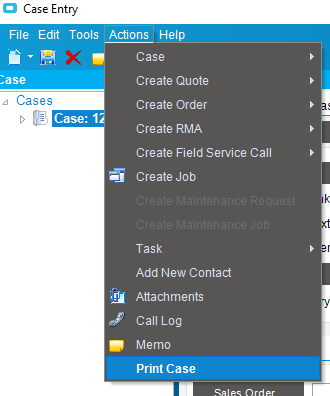
First, I created an event using the Form Event Wizard on Form Load.

Make sure to change the caption to whatever you want the menu to say.
Make sure to add this using statement at the top of the customization code:
using Infragistics.Win.UltraWinToolbars;
Then, this can go at the bottom:
	private void HelpDeskForm_Load(object sender, EventArgs args)
	{
	//create a new button tool for UltraWinToolbars
		Infragistics.Win.UltraWinToolbars.ButtonTool NewTool = new Infragistics.Win.UltraWinToolbars.ButtonTool("Print Case");
	// set the Properties of the new menu
       NewTool.SharedProps.Caption = "Print Case";
       NewTool.SharedProps.Enabled = true;
       NewTool.SharedProps.Visible = true;
   //    NewTool.SharedProps.AppearancesSmall.Appearance.Image = System.Drawing.Bitmap.FromHicon(SystemIcons.Application.Handle);
       baseToolbarsManager.Tools.Add(NewTool);

	// add the new created button tool to Action Menu
	((Infragistics.Win.UltraWinToolbars.PopupMenuTool)baseToolbarsManager.Tools["ActionsMenu"]).Tools.Add(NewTool);

	// create the Tool clik method of your created tool
	       NewTool.ToolClick += new Infragistics.Win.UltraWinToolbars.ToolClickEventHandler(NewTool_ToolClick);
	}

	private void NewTool_ToolClick(object sender,Infragistics.Win.UltraWinToolbars.ToolClickEventArgs args)
    {
		// Establish your reference to the BAQ Report UI
		Ice.UI.Rpt.BAQReport.Transaction trans = new Ice.UI.Rpt.BAQReport.Transaction(oTrans);

		// Load the specific BAQ Report by ID you are interested in
		trans.LoadBAQReportData("CaseReport");

		// Get the current Case Number
		var myEDView = oTrans.Factory("HDCase");
		var currentRow = myEDView.dataView[myEDView.Row];
		int caseNum = Convert.ToInt32(currentRow["HDCaseNum"]);

		// Fill in the parameters to run the report.  You can find these
		// by using field help on the BAQ Report dialog.
		EpiDataView edvData = (EpiDataView)trans.EpiDataViews["ReportParam"];
		edvData.dataView[edvData.Row]["field1"] = caseNum;

		// Submit to system agent.  You can do either a preview or print here
		trans.RunDirect("Preview");

		// Clean up the objects
		edvData.Dispose();
		trans.Dispose();
    }
Keep in mind this was for a BAQ Report. For an SSRS Report, it would be slightly different.
EDIT:
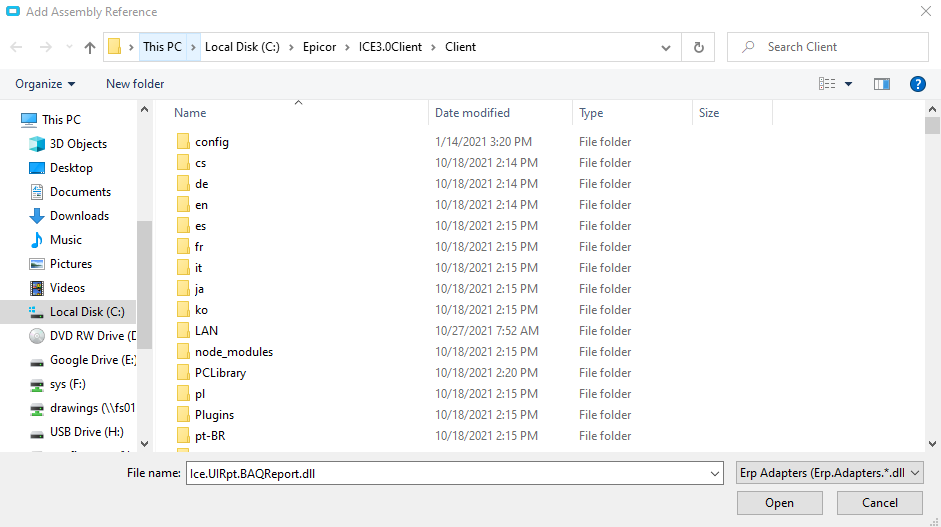
I tried to apply my own work instruction as I added a menu item to do a BAQ Report at a different screen (Serial Number Tracker). It failed with the error:
The type or namespace name ‘Rpt’ does not exist in the namespace ‘Ice.UI’ (are you missing an assembly reference?)
I had to go to Tools > Assembly Reference Manager and add a reference to Ice.UIRpt.BAQReport.dll. See screenshot. I could not “find” this by searching, but if I just started typing it in to the filename box, it showed up.

4 Likes
@dr_dan This is excellent. Thank you.
Where I had wanted to do this before was an (AR) invoice form built from scratch, but I needed it to be still part of the Invoice Entry screen (and the tracker). I lost heart and we had a consultant modify the normal ARForm, and now we have to rehire that consultant every time we update Epicor just to uplift the ARForm to not break because of whatever new field they added to in that version.
Yes so if you recreated the ARForm as a BAQ Report, for instance, this would be the trick to reference it. Though in your case, it might be slightly different since the action menu item is already there. You may want to remove the existing action menu item and insert this one in it’s place. Might be a fun little experiment.
@rfoerst - I hope this helps you on your way.
@dr_dan Hi Thanks for your good tips.
For the ARForm Invoice print preview can we do same like BAQReport method as direct preview but I would like to select a specific report style.
Without looking into it, I can’t say how you define the report style in the code - but I am 99% sure I saw that somewhere. If you don’t have any luck finding it, I will look into it.
@dr_dan Hi, its ok i found the code for this able to direct preview the report with the report style needed. thanks.
1 Like
Hi
I have been following the thread, but it sends me this error:
Compiling Custom Code …
----------errors and warnings------------
Error: CS0103 - line 59 (219) - The name ‘oTrans’ does not exist in the current context
** Compile Failed. **
this is my code:
private static void btnPrint_Click(object sender, System.EventArgs args)
{
   // Establish your reference to the BAQ Report UI
   Ice.UI.Rpt.BAQReport.Transaction trans = new Ice.UI.Rpt.BAQReport.Transaction(oTrans);

   // Load the specific BAQ Report by ID you are interested in
   trans.LoadBAQReportData("OrderFulfillMX");

   // Fill in the parameters to run the report.  You can find these
   // by using field help on the BAQ Report dialog.
   EpiDataView edvData = (EpiDataView)trans.EpiDataViews["ReportParam"];
   edvData.dataView[edvData.Row]["field1"] = "Order";
   edvData.dataView[edvData.Row]["field2"] = "Order Line";

   // Submit to system agent.  You can do either a preview or print here
   trans.RunDirect("Preview");

   // Clean up the objects
   edvData.Dispose();
   trans.Dispose();
}
Let me guess, you’re in a dashboard?
1 Like
Yes it’s correct. Any idea how to solve it
Deploy the dashboard as an assembly and do the customization on the deployed dashboard assembly.
Now, how can I get the value of a text box on this dashboardboard from the custom?
Depends on where it was added.
If you added it in customization after deployment, just use it’s name.
If it’s from the base deployed assembly, use csm.GetNativeControlReference

edit the file filter condition because you are selecting Erp.Adapters.*.dll switch to All to find all dlls in the directory
Good luck and have a nice day!

Launching it?