We have created something similar to this idea. We spent a lot of time looking for help and code to assist with the BatchOps dobatching side of it but in the end figured it out ourselves at great pain. However, I wanted to share my findings with those who may want to try this for themselves but are unsure where to start or need pointed in the right direction. (You will need the Advance Production Module to use this option as mentioned in comments above)
Start with an Updateable BAQ ( this will be used for both your Dashboard and for calling the BatchOps dobatching method). You will also need to have the JobOper table linked in this BAQ as you will need the JobOper.SysRowID values in order to do the BatchOps successfully.
In your UBAQ go to the update tab and then update processing - Select the business object Table that you will be updating - we used JobEntry with UpdateExt Update Method. Next click on the BPM Directives Configuration and create a new Base Processing Directive and then Design (Don’t forget to enable this Base Processing directive).
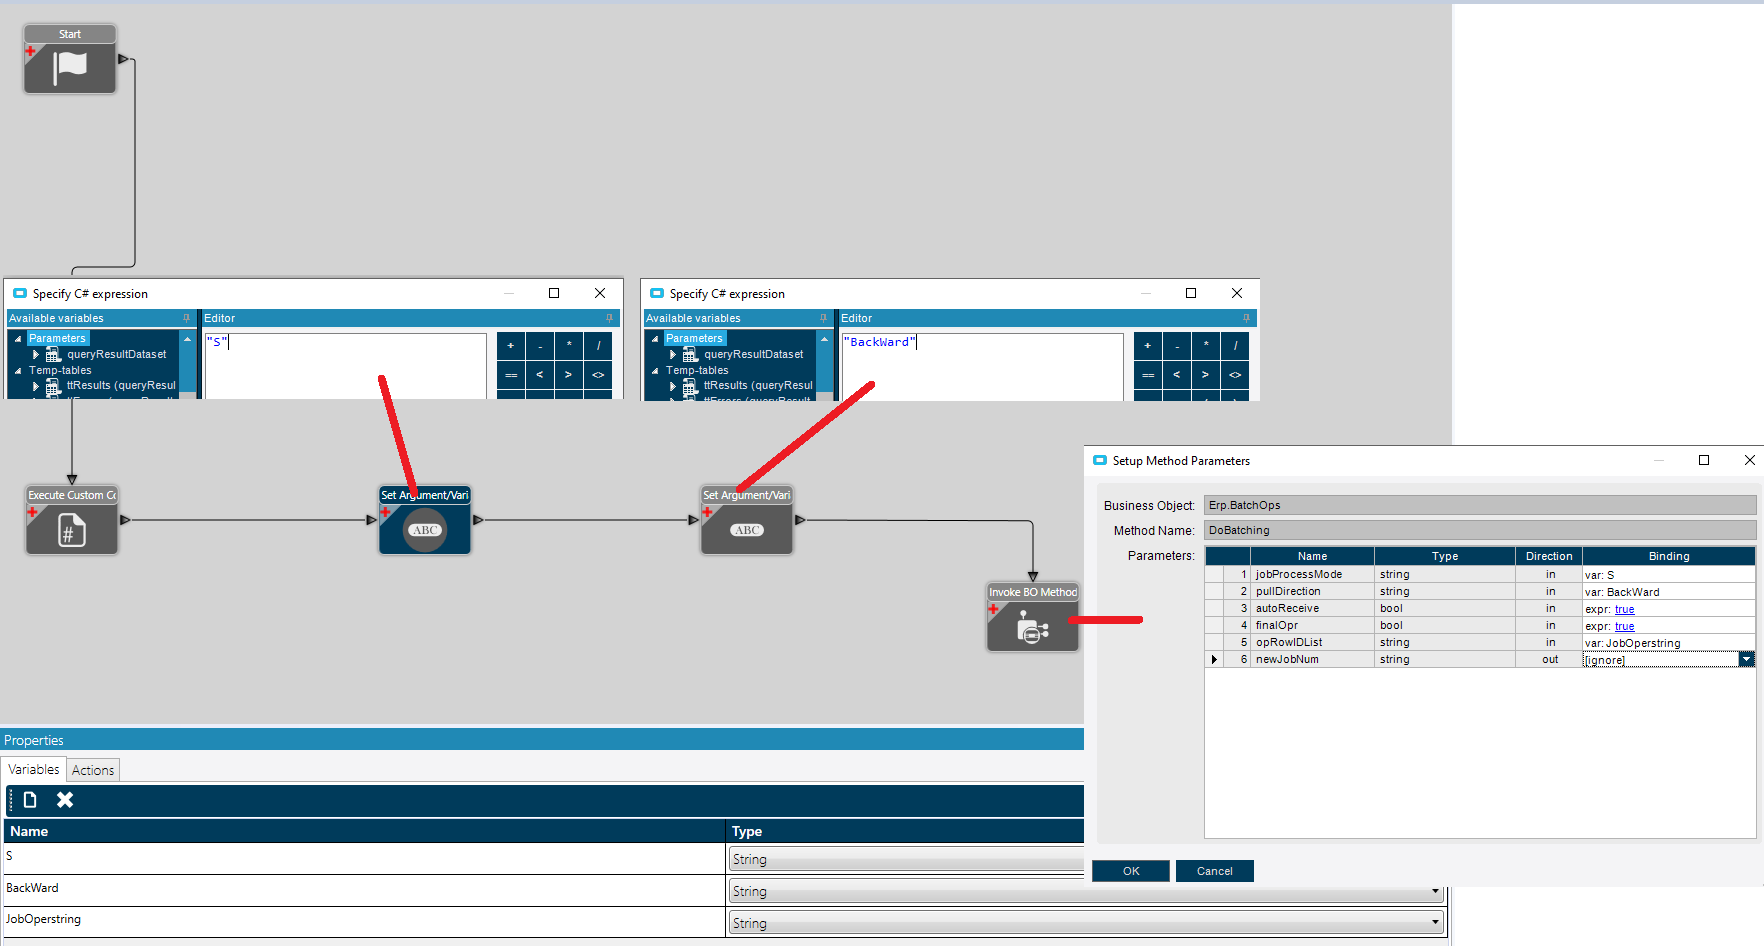
In the BPM Designer Create 3 new variables - we used S , BackWard and JobOperstring.
You now need to insert some Custom Code - this will likely be used for using a check box in your Dashboard to select the jobs you want to batch etc. which in turn updates your JobHead Table from your UBAQ. (I’m not going to go into this side of things - There are lots of other Threads to help you with this) Within your custom code you will have a foreach loop to loop through the rows of the jobs that have been selected (in our case via a checkbox).
Just before your foreach loop create a variable to store the JobOper.SysRowID values for each of the jobs selected. We used var JobOpersys = “”; As the code loops through we want to add each of the selected jobs JobOper.SysRowID values to it. So within the foreach loop code add JobOpersys = JobOpersys + ttResults_xRow.JobOper_SysRowID.ToString() + “,”; (you may need to substitute ttResults with the tt table that your ubaq has created) this will add each of the sysrow id’s seperated by a comma. Finally, Outside of the foreach { loop code } loop, have the BPM variable JobOperstring we created above reference the loop sysrow id’s variable. JobOperstring = JobOpersys.Remove(JobOpersys.LastIndexOf(’,’)); (The remove option here is used to remove the final trailing comma from our string).
Example:
var JobOpersys = “”;
foreach(var ttResults_xRow in (from ttResults_Row in ttResults select ttResults_Row))
{
your additional Loop code for check boxes, etc. goes here
JobOpersys = JobOpersys + ttResults_xRow.JobOper_SysRowID.ToString() + “,”;
}
JobOperstring = JobOpersys.Remove(JobOpersys.LastIndexOf(’,’));
Back to the BPM Designer create 2 set argument/varaibles - in the first set the S variable we created to equal the expression “S” then in the second set the BackWard variable to equal the expression “BackWard”.
Now we want to add the Invoke BO Method to call the Job Batching process. Once added configure it to call the BatchOps business object and Select the dobatching option from here. Finally we need to configure the parameters - this is where we use the 3 variables we created back at the start. There are 6 options in here:
set 1. jobProcesMode to the Var: S
set 2. pullDirection to the Var: BackWard
set 3. autoReceive to the expression true
set 4. finalOpr to the expression true
set 5 opRowIDList to the Var: JobOperstring
set 6: newJobNum to [ignore]
Link each of these from Start to Execute Custom Code to set argument/Variable 0 to set argument/Variable 1 and then to Invoke BO Method. Then Validate and save.
Now when you run your dashboard for Batching it should automatically run the Do Batching and Batch the selected jobs from your Dashboard resulting in a new job number which will be the 1st jobnumber of those selected followed by a -1
We haven’t looked at scheduling these Batched Jobs as yet so I can’t currently help if you wish to explore that side of things further.
Hopefully this will help some. (I know I could have used it when we were trying to figure this out)