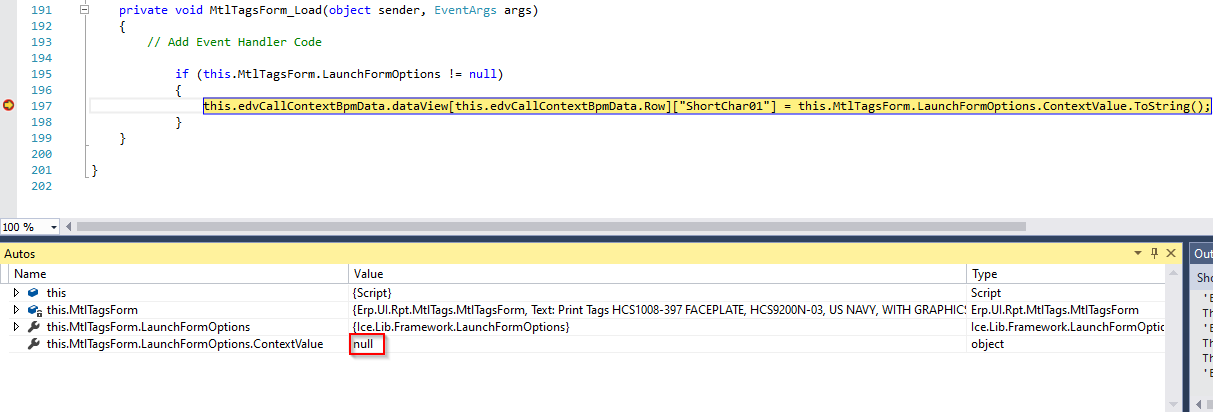
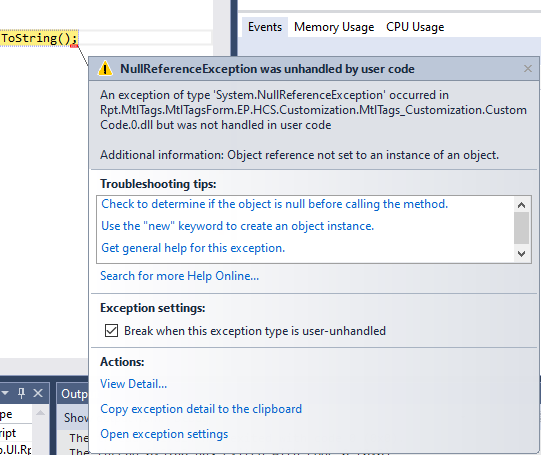
Just a wild guess, but maybe ContextValue is null when you’re calling ToString() on it. Try launching the material tags form with the debugger and see where it throws the exception.
Well, it seems after debugging (selecting the MtlTags customization and clicking on Debug in Visual Studio) that, indeed like you said, the ContextValue is null. This confuses me as there is a pack slip number populated on the receipt entry screen when the MtlTag screen is called.
Update!
I discovered that the customization for the Receipt Entry screen was not associated in Menu Maintenance! I do not know why or how both the Receipt Entry and Material Tags forms had their customizations disassociated from them. At any rate, they both are invoked now and the pack slip number is populating in {callContextBpmData.ShortChar01}!!! Thank you so much for your patience and help through this Tanesh. I have learned a lot! Happy Holidays!
Hi Tanesh:
Just wanted to say Thank You again for all your help!
I have implemented the customization in our production environment and everything is working as expected. I have learned a great deal through this experience and look forward to applying it to other projects in the future!
Cheers,
James
Happy new year, James!
I’m glad to hear you got it working. Figuring this out was a massive pain back when I first did this, so I’m really happy that I could help you out.
You most certainly did and I am ever so grateful and indebted to you.
Happy New Year!!!
I worked through this process myself and I distilled it down to a set of steps I’ve written out for posterity.
After a tweak to BuildMtlTagParams, setIncomingParams is working for me, I’m on 10.2.200. The credit goes to jarrington and tmanjrekar. Thanks for the post!
Steps to get pack slip into CallContextBpmData
a. Create Material Tag Customization
- Turn on Developer Mode
- Open Receipt Entry
- Choose a PO and pack slip
- Go to Actions > Print Tags
- Wait for the Mtl tags form to open
- Go to Tools > customization
- Load the code in the “PrintTagCustomization.cs” file into the script editor
- Compile, save, and close
- Turn off Developer Mode
- Restart Epicor client.
b. Create “Material Tag” Process in Menu Maintenance
- Open Menu Maintenance
- Click on the “Processes” folder.
- Click “New group”
- Enter a menu ID. This guide will use “UD1000”. Any unique value is fine.
- Set Name to “Material Tag”.
- Choose the Program “Erp.UIRpt.MtlTags.dll”
- Choose the customization created in section a.
- Save and close
c. Create Process
- Open “Process Calling Maintenance”
- Set Called Process Reference to: “Erp.UIRpt.MtlTags”
- Set Called From to “Erp.UI.ReceiptEntry”
- Set Menu ID to use “UD1000”
d. Create Receipt Entry Customization
- Turn on Developer Mode
- Go to Tools > Customization
- Load the code in the “ReceiptEntryCustomization.cs” file into the script editor
- In the script editor, replace the menu ID with your menu ID, if different.
- In the script editor, replace the GUID for the Pack Slip Textbox if different.
- Compile, save, and close.
- Turn off Developer Mode.
- Restart Epicor client.
e. Activate Customization in Menu Maintenance
- Open Menu Maintenance
- Go to Main Menu > Material Management > Shipping / Receiving > General Operations > Receipt Entry
- Select the customization created in section d.
- Save and close
f. Resolving setIncomingParamsFromReceiptEntry Errors
If you encounter the error, “Index was outside the bounds of the array, caught in MtlTags.Transaction.setIncomingParamsFromReceiptEntry”, follow this.
- Turn on Developer Mode
- Open Receipt Entry
- Go to Tools > Customization
- In the script editor, the BuildMtlTagParams() method may need to be changed.
- To solve this, we must decompile the material tag code to know what information it expects to be sent from the Receipt Entry screen using a decompiler (e.g. DotPeek).
- Install a decompiler and load the dll from the Epicor Install path: Epicor\ERP10.2Client\Client\Erp.UIRpt.MtlTags.dll
- Select the namespace: Erp.UI.Rpt.MtlTags
- Select the type: Transaction
- Open method: setIncomingParamsFromReceiptEntry
- This method definition contains the “inverse” function to BuildMtlTagParams in the Receipt Entry Customization code.
- Modify the BuildMtlTagParams() method in the Receipt Entry Customization so that the parameters correspond to what is found in the setIncomingParamsFromReceiptEntry decompiled method.
- Save the customization and close.
- Turn off developer mode.
- Restart Epicor and test again.
PrintTagCustomization.cs (1.8 KB) ReceiptEntryCustomization.cs (5.9 KB)
2 Likes
Hi,
Might be silly question, but how do you know that the syntax has to be opts.ValueIn = and delimited by “~”. I am pretty sure that on e9 it was possible to pass data in ContextValue and delimiter was “;”.