How To: Advanced Scheduling Techniques using APS

I am going to start this topic but not finish it immediately as there is a lot to explain. Basically, I’ve spent the last week beating the heck out of the Scheduling Engine to figure out how to get the schedule to be dynamic based on the number of employees working on an operation. This is the topic that started me down this path.

Whenever I actually finish this topic, I will have explained how to accomplish two things:

  1. How to have the system dynamically adjust the length of an operation based on the number of employees assigned to it.
  2. How to get the schedule to split an operation between shifts.

The image below is from my test environment. I created 9 jobs for a quantity of 1 that only has 1 operation with a standard of 16 hours. The yellow highlighted job is set to 3 employees, the green highlighted is set to 1 employee, the pink highlighted is set to 4 employees (yes, I know it is only showing 3, that will be explained later), and all other jobs are set with 2 employees.

Now, there are a load of caveats that come with the set up.

  1. You cannot use the scheduling boards to view the “workspace”. This is because we are using Concurrent Capacity, Scheduling Blocks, and Split Operations.
  2. Because you cannot use the out of the box tools, you have to create your own dashboards to see the load placed against the “workspace” resources.
  3. This is not a set it and forget it thing, an employee will have to maintain the Scheduling Blocks and Concurrent Capacity on the Jobs. I plan on creating an updateable dashboard to make it easier.
  4. You must run finite.
  5. You must own Advanced Planning & Scheduling.
  6. The set up of your environment will not be the same as my test. This solution requires someone who understands your companies’ resources to plan it out. I will explain the rationale for what I use.
  7. It is not perfect and there will be some weird results (see my 4 employee example above). I believe forward scheduling will reduce the weirdness (my example is backwards scheduled).

That’s a good start. My next post will be an explanation of the advanced settings and how to determine the set up your company needs.

12 Likes

curiosity GIF

3 Likes

I did not forget about this! As I was writing it up, I tested adding more resource blocks on the method/job operation than the number of scheduling blocks on the resource group. I expected that job to not schedule, but it actually honored the number of scheduling blocks on the method/job and split the operation by the value on the operation. I need to test this out and see if it impacts my solution at all. I think it will impact it in a positive way.

1 Like

This shift problem is exactly what I’ve been working on for years. Epicor and all the partners I’ve talked to say it can’t be done easily. A few years back I got close but no real solution. I’ve got CSG currently working on a way. If you get close, maybe we can add what CSG is looking at and come up with something.

3 Likes

The STRG (Scheduling Technical Reference Guide) is your friend, if you have not read it, you should. I am not going to get too in depth with my explanations, so if you are confused, go read the guide first.

Also @mbilodeau has a great post on scheduling blocks that you should read before diving into mine.

Scheduling Blocks
Basically, this is how many blocks of load can be placed against an operation. This tells the system the number of Resources that one operation runs on at a time. There are two places this needs to be set. First is the Resource Group and this basically just sets the default on a method operation when the RG is selected. The second place where SBs are set is on the Method/Job Operation. You can set this value higher than the SBs on the RG. This does not make much sense until you factor in Capabilities and Split Operations.

Concurrent Capacity
This is where things start to get confusing. The intent behind Concurrent Capacity is for operations that use a resource like an oven. You define what the resource can hold, in the case of the oven it may be 12 trays. Then you define how many trays the operation consumes of the 12 trays, let’s say 4. Because that operation only consumes 4 trays, there are still 8 more trays that could be scheduled. That is the defined intent of the field in the STRG, but I have concocted a way to use it to shrink operation run times. There are two places where this needs to be set. The first is the Resource (not the Resource Group). I set all of my Resources where that I want the scheduled time to be dynamic to 1. Setting it on the Resource is the limiting factor, if the load that an operation will place against a Resource makes the CC greater than the Resource, the scheduling engine will not schedule the operation. The second place where this needs to be set is on the Method/Job Operation Detail Scheduling Resource. This is where you have to do a little math to figure out what to enter here. I will explain that a little further down as I think it will make more sense in context.

Split Operations
Another level of confusion. From the STRG: Use the Splitting Operations modifier to indicate that Production Time on a resource can be divided evenly between multiple scheduling blocks at different points within the schedule. As the engine allocates scheduling blocks against a resource, it can separate these blocks at points wherever capacity is available. Basically, takes the total operation hours and says that it can be split and run on different resources anywhere the engine can find time. If you do not select this option, it will schedule a contiguous SB on a resource. This allows the engine to break down operations into the smallest chunks to try and find time to schedule them.

My Example Settings
Employee Resource Group - all employees were added to a single RG.

  • Finite horizon: 365
  • Scheduling Blocks: 1
  • Split Operations = true

Employee Resources

  • Finite = true
  • Finite horizon: 365
  • Use Resource Group Values = true

Bays (“workspace”) Resource Group - 1 Resource per RG

  • Finite horizon: 365
  • Scheduling Blocks: 1
  • Split Operations = true

Bay Resources

  • Finite = true
  • Finite horizon: 365
  • Use Resource Group Values = true
  • Concurrent Capacity = 8

The method I created was real simple. Only 1 material. Only 1 Operation. Prod Qty of 1

Operation

  • Est time is 16 hours
  • SBs 2
  • 2 Scheduling Resources (I used Capabilities for both the employee and bay)
  • The Employee Scheduling Resource does not need to be altered
  • The Bay Scheduling Resource needs to have a Concurrent Capacity value set. Remember, this is the amount of load will be placed against the Resource in each scheduling block. I use the following formula to figure out the CC to put on the Scheduling resource

If( Total Operation Time / Operation Scheduling Blocks >= Resource Concurrent Capacity, Resource Concurrent Capacity, Total operation Time / Operation Scheduling Blocks)

So in my example here is what the Concurrent Capacity should be based on Op SB

16 hrs / 1 SB = 16, Concurrent Capacity should be 8
16 hrs / 2 SB = 8, Concurrent Capacity should be 8
16 hrs / 3 SB = 5.33, Concurrent Capacity should be 5.33
16 hrs / 4 SB = 4, concurrent Capacity should be 4

Now you can run Generate Shop Capacity, Calculate Global Scheduling Order, and Global Scheduling (Finite)

1 Like

So, why does this set up work? Let’s look at the Employees first as that is the simple one.

The operation has 2 scheduling blocks, which means that the total operation time of 16 can be split into 2 8 hour blocks. Since we used a Capability for the Employees, the scheduling engine will review every Resource in the Capability and try to find 2 employees that are available at the same time so the operation can be done in 8 hours.

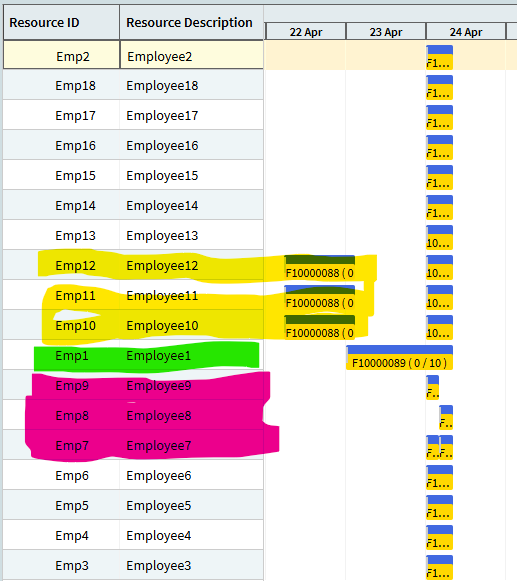
Now the Bays. First thing to note, you CANNOT look at the Job Scheduling Board or the Multi Resource Scheduling Board for the bays. Here is why:

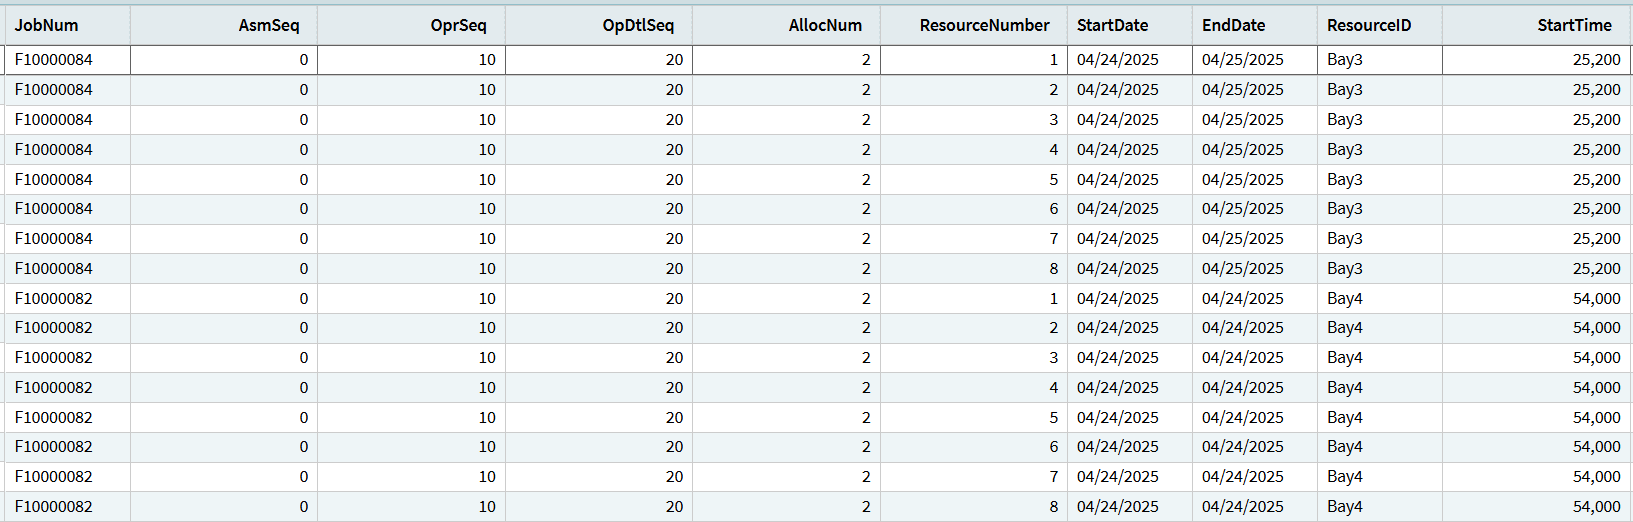
If you look at the boards, it appears that the operation was scheduled on 2 bays! It is a false flag. In the system, it is only scheduled on bay4. To see this, you have to look at the ResourceTimeUsedSub table, this is where the load for Concurrent Capacity is held. Here is a BAQ I ran that shows this.

You can see that F10000082 is scheduled on Bay4 and F10000084 is scheduled on Bay3. But what are all those other columns and why are there 8 rows for each job?

Let’s start by explaining how the ResourceTimeUsedSub table works. If you remember from above, I set the Concurrent Capacity of the Resources to 8. When the engine is calculating load on a CC Resource, it adds together the CC on the job operation and once the sum of the CC goes over 1, it adds a row to RTUSub and considers 1 of X capacity to be filled. Since I made the CC on the Resource 8, there are 8 slots that need to be filled before the engine considers the Resource full. Your next question might be, why not just make the CC on the Resource 1. Well, the CC calculation is not that robust with decimals. I have tested it out using 1 as the Resource CC and you get unexpected results. You don’t have to use 8, but using a larger number makes it work better with less unintended consequences.

The AllocNum column is the scheduling block that the engine placed the load against. When you capture the individual Job Scheduling logs, you can see better what is happening. When you use a non-time constraint, the engine runs the same for the resource in regards to time, but it does not actually use the time for the load. Let’s look at an example.

Backward Scheduling - F10000082 0 10 20 - P time of 16.00. --- operationBackward
22:31:57                 		Backward Scheduling - Job F10000082 Asm 0 Opr 10 OpDtl 20 AllocationBlock - 1 For: Enddate - 4/25/2025 EndHour - 7 Endtime 1 Setup/Prod/Both P. tmpendtime 626647. --- OpDtlBkProduction
22:31:57                 	Processing Capability : Bays  --- getResourceList
22:31:57                 	Processing Resource Bay1 --- processCapability
22:31:57                 		***Scheduling resource Bay1 for 8.00 hours  --- processResourceID
22:31:57                 		Making production calendar for Resource Bay1 from production calendar 90382. --- MakeConResCal
22:31:57                 		Backward Scheduling  Bay1 for 8.00 hours on 4/25/2025 with a EndTime of 7 IP-ProcTime 7. --- processResourceID
22:31:57                 		 Checking IP-ProcTime 54000 to be sure valid time - C --- GetNextGap
22:31:57                 		 Checking IP-ProcTime 42480 to be sure valid time - C --- GetPrevGap
22:31:57                 		Finitely scheduling Bay1 FiniteHorizonDate 4/3/2026 ScheduleDate 4/25/2025 --- GetBackwardDateTime
22:31:57                 		Found 4/25/2025 as a valid working date IP-ProcTime = 25200 --- GetBackwardDateTime
22:31:57                 		Found 4/25/2025 as a valid working date --- GetBackwardDateTime
22:31:57                 		Scheduling resource Bay1 starting at time: 4/25/2025 7   (getBackwardDateTime)   --- GetBackwardDateTime
22:31:57                 		Scheduling resource Bay1 for : ScheduleDate 4/25/2025 FirstProdHour 7 LastProdHour 7   (getBackwardDateTime)  --- GetBackwardDateTime
22:31:57                 	Our Requested current Capacity is  8.00  Total Resource Capacity is 8.00   --- getBWConCapDateTime
22:31:57                 	Current Capacity is  8.00 requested capacity is 8.00 Total Resource Capacity is 8.00   --- getBWConCapDateTime
22:31:57                 		Looking to Schedule 8 Hours Ending on 4/25/2025 and an end hour of 7 (getPrevTotalAvailProdTime)  --- GetPrevTotalAvailProdTime
22:31:57                 		 Found that resource Bay1 has 8 working hours on 4/25/2025.  --- GetPrevTotalAvailProdTime
22:31:57                 		Looking to Schedule 8 Hours Ending on 4/25/2025 and an end hour of 7 (getPrevTotalAvailProdTime)  --- GetPrevTotalAvailProdTime
22:31:57                 		 Total hours Found  0 on 4/25/2025  (getPrevTotalAvailProdTime)  --- GetPrevTotalAvailProdTime
22:31:57                 		 Found that resource Bay1 has 8 working hours on 4/24/2025.  --- GetPrevTotalAvailProdTime
22:31:57                 		Looking to Schedule 8 Hours Ending on 4/24/2025 and an end hour of 7 (getPrevTotalAvailProdTime)  --- GetPrevTotalAvailProdTime
22:31:57                 	Start times obtained: Start Date = 4/24/2025, Start Time = 7 --- getBWConCapDateTime
22:31:57                 		Scheduling Resource Bay1 for job F10000082 Operation 10 Priority 100 StartDate 4/24/2025 EndDate 4/25/2025. --- processResourceID
22:31:57                 		***Done Scheduling Resource Bay1 for job F10000082 Operation 10 Priority 100 StartDate 4/24/2025 EndDate 4/25/2025 Move Date 4/25/2025. --- processResourceID
22:31:57                 	*First available time for Resource Bay1 is 4/24/2025 at 25200 (7) ending on 4/25/2025 at 7 for 8 hours. Move Date 4/25/2025 Move Hour 7. --- processResourceID

If you look through this, there are a couple of things to notice. First is the second line. See the Allocation Block - 1? That is the engine saying there are 2 SBs and I am trying to fill the first SB. You will also see that the engine is trying to schedule time. This is another false flag as it really is not, but it is helpful because that determines the StartTime in the BAQ above. The next thing to look at is the CC lines (15 & 16). It shows you what the Operation is requesting (8) and what the Total Resource has (8). Then it says, if I put this 8 on the Resource, this is the total CC that will be on the Resource and this request is 8 so can it fit on the total CC for the resource (8)? Here is an example of it being overloaded.

22:31:57                 	Our Requested current Capacity is  8.00  Total Resource Capacity is 8.00   --- getBWConCapDateTime
22:31:57                 	Current Capacity is  16.00 requested capacity is 8.00 Total Resource Capacity is 8.00   --- getBWConCapDateTime
22:31:57                 	** Not enough capacity. Try again starting at time 4/23/2025 - 23. Time 1  --- getBWConCapDateTime

You can see that there is not enough capacity, so the engine moves on.

The other part to look at in the log is near the very end.

22:31:58                 Rough cut scheduling F10000082 False. Job start date 4/24/2025 Rough cut date 4/3/2026. --- CommitJob
22:31:58                 Create RTU for Job F10000082 Asmbl 0 Sequence 10 OpDtl 20 Whatif True. Resource Bay3 Start date: 4/24/2025, Start time: 54000, End Date: 4/24/2025, End time: 82800 --- CommitJob
22:31:58                 about apply whatif load :  False  --- CommitJob
22:31:58                 Rough cut scheduling F10000082 False. Job start date 4/24/2025 Rough cut date 4/3/2026. --- CommitJob
22:31:58                 Create RTU for Job F10000082 Asmbl 0 Sequence 10 OpDtl 10 Whatif True. Resource Emp3 Start date: 4/24/2025, Start time: 54000, End Date: 4/24/2025, End time: 82800 --- CommitJob
22:31:58                 about apply whatif load :  False  --- CommitJob
22:31:58                 Rough cut scheduling F10000082 False. Job start date 4/24/2025 Rough cut date 4/3/2026. --- CommitJob
22:31:58                 Create RTU for Job F10000082 Asmbl 0 Sequence 10 OpDtl 20 Whatif True. Resource Bay4 Start date: 4/24/2025, Start time: 54000, End Date: 4/24/2025, End time: 82800 --- CommitJob
22:31:58                 about apply whatif load :  False  --- CommitJob
22:31:58                 Rough cut scheduling F10000082 False. Job start date 4/24/2025 Rough cut date 4/3/2026. --- CommitJob
22:31:58                 Create RTU for Job F10000082 Asmbl 0 Sequence 10 OpDtl 10 Whatif True. Resource Emp4 Start date: 4/24/2025, Start time: 54000, End Date: 4/24/2025, End time: 82800 --- CommitJob

This is where you see what was actually scheduled and also where the log is not really telling you the truth. You’ll see that 2 Bays and 2 Employees were scheduled. This is another false flag. You can see that Bay3 and Bay4 were both scheduled (which is why you see that on the board). It does not say it, but the first 2 resources scheduled is for SB 1 and the second 2 resources are for SB 2. That is why the AllocNum is 2 in my BAQ, because it was the number of the SB that the load was applied against. That is why Bay4 is the only bay resource scheduled against the job.

The ResourceNumber column can be thought of as the trays in my oven example earlier. This oven (bay) can hold 8 trays. Each ResourceNumber line is load being applied to that tray. You can also take the StartDate, EndDate, StartTime, and EndTime and compare that to the employee resources to see that the blocks line up.

Let’s look at the job with 4 SBs, remember the 4 represents 4 employees.

You can see that this only created 4 lines in RTUSub. This is because each SB consumes 4 of the resources SBs. Here is a clip from the log.

22:32:05                 	Our Requested current Capacity is  4.00  Total Resource Capacity is 8.00   --- getBWConCapDateTime
22:32:05                 	Current Capacity is  4.00 requested capacity is 4.00 Total Resource Capacity is 8.00   --- getBWConCapDateTime

Each SB appears to be consuming half of the CC, but it is actually consuming double the ResourceNumber. Which is why there are only 4 rows in the query. This is very confusing, but it works.

This is the reason why you need to create your own report/dashboard to track the bay resources. If you look at the boards/RTU table, that does not show reality. I have not created anything for this yet, but it would be very dependent on your individual set up.

1 Like

The next revelation I had on this testing adventure is that the Scheduling Resources on a Released Job are editable! That means you can change parameters on them, add Scheduling Resources, and delete Scheduling Resources all without Un-Engineering the Job!!!

I plan on creating an updateable dashboard that would allow a user to see the data from RTUSub and then make changes to the Scheduling Blocks on the Operation and to change the Concurrent Capacity on the Scheduling Resource. It would also be advantageous to allow the creation and deletion of JobOprDtl records.

This updateable dashboard would allow the user to quickly update the parameters on the Jobs to get an updated schedule or what if schedule. Like I said earlier, this solution is not 100% automatic, it still needs a person to maintain it, but if you are already maintaining employee resources manually, this allows you to add employees (Scheduling Blocks) to an operation to shorten the time.

Phew! This is a lot and also very confusing. My example was specific to what @dr_dan told me his scenario was. This solution will need to be crafted individually for your company. I imagine people that read this look like one of the below. I am sure I lost many along the way, but please feel free to ask me any questions.

Shocked The Muppets GIF by ABC Network

What The Wtf GIF by Justin

I will get to splitting operations over shifts next. (@MikeGross , I will use your example.)

2 Likes

All I can say is Bravo! You’re doing the work that I was badly wanting to keep working on and have been woefully pulled in other directions over the past couple weeks. I’m looking forward to reading this (likely after hours today) and digesting it.

2 Likes

What can I say, my current company is not challenging me. :man_shrugging:

1 Like

Ok, so splitting operations across shifts is a little bit tougher because Split Operations wants to divide the the Total Estimated Time evenly. In my example, I have an operation that takes 27 hours and 2 shifts of 10 hours each. 27 / 3 = 9, which means the engine is only trying to schedule the employee resources for 9 hours even though they work 10 hour shifts. There are a couple of ways that this can be solved, but I am going to do some more testing to see what I can come up with.

But this is what it looks like right now.
image

1 Like

Here is how to set up your environment to get the scheduling engine to split operations over shifts. It is not perfect; some decisions will have to be made by the company on how to handle the 20% in the 80/20 rule.

Multiple Production Calendars need to be created. A calendar is needed for the total up time of the machines. Create a calendar and set it to 24 hours, then select the actual hours that it will run for. As an example, here is a machine calendar for 20 hours.

If there is a machine that only runs for 1 shift, a separate calendar will have to be created for that. Also, a calendar for each employee shift you run will need to be created. If you run 2 10 hour shifts, a calendar for each shift will need to be created. Set the calendar to 24 hours and check off the hours that shift covers.

Here is the first decision point that needs to be made. Nothing is perfect, so how does your company want to handle the edges? Do you have staggered start times? Some employees start at 6 AM, 6:30 AM, and 7 AM. While it would be nice to create all those calendars, it is better to just create 1 first shift calendar and understand that the operation may say it is going to start at 6 AM, but you know the employee starts at 7 AM. Also, how long do your employees actually work for? It’s a 10 hour shift, are they working all 10 hours? Or is the shift 10 hours and they work 9? Or do they work 10 hours and the shift is actually 11 hours? I recommend creating the shift calendars for the amount of time the employee actual works. If their shift is 6 AM to 5 PM, create the calendar for 10 hours. You are basically setting up the system to provide a directional schedule, not an exact one. You are never going to be able to get down to the minute, so don’t even try. The system will adjust based on the time already worked on the operation.

Now that you have your calendars set up, you can create the Resource Groups. The machine resources should be set up the following way:

  • Calendar should be the one that the machine runs in a day.
  • Scheduling Blocks = 1
  • Split Operations = true
  • Finite Horizon set to whatever your company’s is

The Resources in the RG should be set up the following way:

  • Calendar same as RG
  • Finite Capacity = true
  • Finite Horizon set to whatever your company’s is
  • Concurrent Capacity = how long a single shift is
  • Use Resource Group Values = true

Now to setup the employee RG. You want to create 1 RG for all employees.

  • Calendar should be the first shift calendar
  • Scheduling Blocks = 1
  • Split Operations = true
  • Finite Horizon set to whatever your company’s is

The Resources in the RG should be the following:

  • The calendar should be the shift the employee works
  • Finite Capacity = true
  • Finite Horizon set to whatever your company’s is
  • Use Resource Group Values = true

When the method is created, you will want to add both the machine RG and employee RG as scheduling resources. Depending on your company’s setup, you will have to figure out how many scheduling blocks to default. If you have a Job Lot Size and know the estimated time, divide the estimated time by your shift length to get the number of scheduling blocks. If you only run 1 piece at a time, divide the estimated time by your shift length to get the number of scheduling blocks. You can always add a BPM later on that checks the job quantity, multiplies it by the estimated time, then divide by the shift length to update the scheduling blocks on the job. Or just create an updateable dashboard that allows the scheduler to easily change the SBs.

This set up will get the engine to schedule across shifts. it won’t be perfect, but it does the majority of the heavy lifting.

To further refine the schedule, I would do the following. Note, I have not tested this yet, but I believe it would be fairly easy to do. Create an In-Transaction Data Directive to change the ResourceTimeUsed record that is about to be saved. All of the data will be in the table to do the following:

  • Check the day that the operation is going to start in
  • Find any already scheduled time and note the end time
  • Alter the record to start at that end time and run to end of shift
  • The next record to be saved can then be changed to run for the complete next shift
  • Continue checking the records to be saved and when the final one is saved, set the length for whatever time is left.

Because the Split Operations evenly splits the estimated time, creating this BPM will provide you the flexibility to get closer to reality. If your est time is 27 hours and your shift is 10 hours, the engine will create 3 Allocation Blocks. If the first AllocNum can fit in a 5 hour slot, you can change the RTU record to fill that slot. You will then have to adjust the second AllocNum to the full next shift of 10 hours. The third AllocNum will have to be 10 hours too and you will need to create a 4th AllocNum to get the last 2 hours on the schedule. The RTU table is pretty well defined that it should not be that hard to create the customization. Or, you can just live with the limitations of the system and have a directionally accurate schedule.

Let me know if there are any questions.

2 Likes

Don’t you just move from one bar to another at Insights :slight_smile:

2 Likes

Bookmarked for future reference thanks Mr Kane…

1 Like

LOL - Yes - been doing it for years, TRYING to find someone who has an answer for this exact problem.

1 Like

@jkane I hope to give the attention it deserves in the next couple of days!

Also, I wish I had some free time at work to explore things like this - and - My sincere appreciation for your deep dive on this subject.

3 Likes

He’s the Jacques Cousteau of Epicor Problems… :slight_smile:

3 Likes

jacques cousteau GIF

2 Likes

Anytime, it was definitely fun to do, and I learned from it. I think the biggest takeaways are

  • To “schedule” something and not have it be on the schedule, use Concurrent Capacity
  • Scheduling resources on a job can be edited without un-engineering
  • Production Calendars are really important (we already knew that, but important to reinforce)
  • Split Operations and Scheduling Blocks are useful and dangerous at the same time, so get your head wrapped around that logic early
  • Customization is needed to really deliver the best solution, but it is not anything crazy. I could write the function myself while leaning on the more technical users at this site.
1 Like